

How To Use Graphing Calculator Ti-84 Plus
Turning off Stat Plots (if necessary)
The elevation line in the Y= editor tells you the graphing status of the Stat Plots. If Plot1, Plot2, or Plot3 is highlighted, then that Stat Plot will be graphed along with the graph of your functions. If it'southward not highlighted, it won't be graphed. In the first screen, Plot1 is highlighted and will exist graphed forth with the functions in the Y= editor. 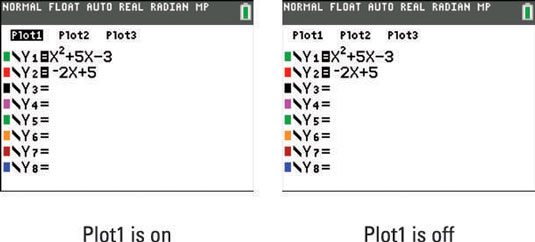
To turn off a highlighted Stat Plot in the Y= editor, use the
![]()
keys to identify the cursor on the highlighted Stat Plot then press [ENTER]. Run into the second screen. The same procedure is used to highlight the Stat Plot again in order to graph information technology at a afterward fourth dimension.
When y'all're graphing functions, Stat Plots tin can exist a nuisance if they're turned on when you don't really want them to exist graphed. The most mutual symptom of this problem is the Mistake: INVALID DIMENSION fault message — which by itself gives you almost no insight into what's causing the problem. And so if you aren't planning to graph a Stat Plot along with your functions, make sure all Stat Plots are turned off!
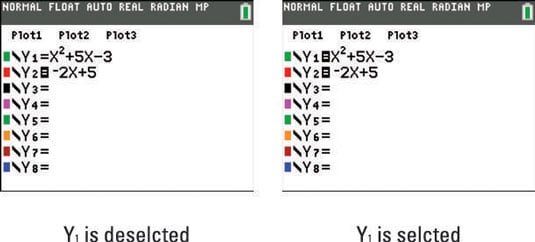
Selecting and deselecting a function on the TI-84 Plus
Deselect (turn off) Y1 and Y2 by removing the highlight from their equal signs. This is done in the Y= editor by using the ![]()
keys to place the cursor on the equal sign so pressing [ENTER] to toggle the equal sign between highlighted and not highlighted. The computer graphs a function simply when its equal sign is highlighted!
Practice you see the difference betwixt the ii screens?
Adjusting the TI-84 Plus graph window
When you graph a function, you usually tin't meet the whole graph. Y'all are express to viewing the graphing window, which typically shows just a small portion of the part. There are four values that make up one's mind the portion of the coordinate airplane you tin see: Xmin, Xmax, Ymin, and Ymax. Press [WINDOW] to display the current window variables. 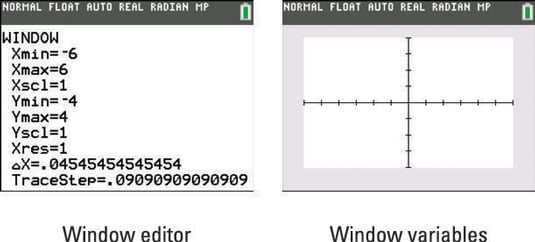
It takes practice to find a skillful viewing window for the function you're graphing. Hither are the steps needed to gear up the window of your graph:
-
Press [WINDOW] to access the Window editor.
-
Subsequently each of the window variables, enter a numerical value that is advisable for the functions you're graphing. Printing east after inbound each number.
Entering a new window value automatically clears the onetime value.
Make sure your (Xmin < Xmax) and (Ymin < Ymax) or you'll get the Error: WINDOW RANGE mistake bulletin.
Editing your Window variables is a good place to get-go equally you lot search for a good viewing window. In add-on, using the Zoom features may exist necessary to perfect your graphing window. The following gives an explanation of the variables you must set to suit the graphing window:
-
Xmin and Xmax: These are, respectively, the smallest and largest values of x in view on the x-axis.
If you don't know what values your graph will need for Xmin and Xmax, printing [ZOOM][6] to invoke the ZStandard command. This control automatically graphs your functions in the Standard viewing window. -
Xscl: This is the altitude betwixt tick marks on the ten-axis. (Go easy on the tick marks; using too many makes the axis look like a railroad track. Twenty or fewer tick marks makes for a squeamish looking x-centrality.)
If you want to turn off tick marks altogether, set Xscl=0 and Yscl=0. -
Ymin and Ymax: These are, respectively, the smallest and largest values of y that volition be placed on the y-axis.
If you have assigned values to Xmin and Xmax only don't know what values to assign to Ymin and Ymax, press [ZOOM][0] to invoke the ZoomFit command. This command uses the Xmin and Xmax settings to determine the appropriate settings for Ymin and Ymax, then automatically draws the graph. -
Yscl: This is the distance between tick marks on the y-centrality. (As with the x-axis, likewise many tick marks brand the axis look like a railroad track. Fifteen or fewer tick marks is a nice number for the y-centrality.)
-
Xres: This setting determines the resolution of the graph. It can be set to any of the integers 1 through viii. When Xres is set equal to i, the calculator evaluates the office at each of the 133 pixels on the ten-centrality and graphs the result. If Xres is set equal to 8, the function is evaluated and graphed at every 8th pixel.
Xres is usually set equal to 1. If you're graphing a lot of functions, information technology may have the reckoner a while to graph them at this resolution. If you change Xres to a college number, your function will graph quicker, only you may not get every bit accurate of a graph.
-
TraceStep and

These two variables are linked together, and TraceStep is always twice as big as

value, which determines how your cursor moves on a graph screen in "complimentary trace." TraceStep controls the X-value jump when you are tracing a function on a graph screen.
-
-
Press [GRAPH] to graph the functions.
Stopping or pausing your TI-84 Plus graph
Afterward pressing [GRAPH], at that place'southward commonly a small-scale delay before you brainstorm to see your office plotting on the graph from left to correct. If it'due south taking a long time for the calculator to graph your functions (maybe your Xres setting is too small), printing [ON] to terminate the graphing process.Simply press [ENTER] to pause the plotting of your graph and and so press [ENTER] again to resume graphing. Come across the following two screens. Find, the elliptical busy indicator in the superlative correct corner of the screen indicating that your estimator is working hard.

About This Commodity
This article tin can be found in the category:
- Graphing Calculators ,

How To Use Graphing Calculator Ti-84 Plus,
Source: https://www.dummies.com/article/technology/electronics/graphing-calculators/how-to-graph-functions-on-the-ti-84-plus-160993/
Posted by: smithhower1967.blogspot.com
0 Response to "How To Use Graphing Calculator Ti-84 Plus"
Post a Comment